
Overview
Dunwich Horror is an expansion to Arkham Horror 2nd Edition that includes a new game board and expansion-specific components to support a number of new game mechanics, as well as new core-set components to add more depth to the core game. Released in 2006, it was the second expansion, following the Curse of the Dark Pharaoh expansion released earlier that year, but it was the first “big box” expansion, as Curse did not include a new board.
Author’s Note: This article is based on the Author’s analysis of the game rules and components. A .pdf of the original rulebook is available from the publisher here.
This document is also available in a printable format.
Based on the eponymous H.P. Lovecraft story, this expansion is set in “the small country town of Dunwich, just a few miles from Arkham;” as Lovecraft notes, Dunwich is “ridiculously old—older by far than any of the communities within thirty miles of it.”
The expansion uses locations and characters from the story to expand the scope of the core game in a thematically pleasing manner— “The Dunwich Horror” is particularly well-suited for adaptation as an expansion— while making the game significantly more challenging, increasing the tactical and strategic options available to Investigators, and improving playability in some key areas.
The expansion includes a new board, which is one-third the size of the core set board. A hefty pile of new core-set-type cards are included as well: both Investigator cards (15 Common Items, 25 Unique Items, 21 Spells, 11 Skills and 5 Allies) and Ancient One cards (63 Arkham Location cards, 42 Dunwich Location cards, 36 Mythos cards and 32 Gate cards).
There are also a number of new types of cards related to the mechanics introduced by the expansion: Injury cards, Madness cards, Condition cards, Dunwich Horror cards, Rail Passes, and Sheldon Gang Memberships.
Also getting new blood are the Investigators, with eight new options provided, and the Ancient Ones, as the Mythos gains new ultimate horrors: Abhoth, Glaaki, Shudde M’ell and Tsathoggua.
Monsters are not forgotten either, with a total of 28 new markers that represent 17 types of Monsters, 14 of them new to the game at the time of publication. Gates get significantly less love; there are only 4 new gate markers, representing two new Other Worlds.
As Dunwich was the first full expansion to the game, the publisher used it as an opportunity to do a bit of revision to the core set; to this end, the expansion includes seven replacement cards to be swapped in for the corresponding core set cards, as well as two pages of rule changes. These are all unnecessary in light of the revised printing of the core game, which already incorporates all of these changes. There is also a three-page FAQ, which may still prove useful on some specific points.
Partial Implementation
As some of the components make explicit reference to or use of the Dunwich board, they cannot be used without using the board as well. Examples include the new Mythos cards (some of which spawn Gates and/or Clues at Locations in Dunwich), the new Gate tokens and the Dunwich Location cards.
Additionally, about a third of the new Arkham Location cards make use of various Dunwich mechanics, making it impractical to use them absent the full implementation of the expansion.
However, some expansion components are separable, and could be used with the core game by themselves or in combination with each other. These are:
Madness and Injury cards

The Madness and Injury decks are part of one of the most popular expansion mechanics in the game, as they provide an alternative to losing half of an Investigator’s Items, Spells and Clues when they become Unconscious or Insane.
This new ruleset allows the player to opt to draw a card from the appropriate deck when an Investigator becomes Unconscious or Insane; the result is a significant, essentially-permanent debility that will likely hamper the Investigator for the remainder of the game. The Investigator then moves to St. Mary’s Hospital, Arkham Asylum or Lost in Time and Space as appropriate, and the attribute that was reduced to zero is restored to its maximum.
An Investigator can have multiple cards of each type, but if a duplicate is ever drawn, the Investigator is Devoured. An Investigator with two or more Madness/Injury cards can be Retired at the option of the player, and replaced without penalty after missing a turn.
Implementation: During Setup, shuffle the Madness deck and the Injury deck and place them with the other Investigator decks.
Notable benefits: Provides significant tactical flexibility in dealing with one of the more serious setbacks that can commonly occur during the game, and does so in a realistic, thematically appropriate manner. Sometimes losing half of an Investigator’s “stuff” is a non-issue, and is the better option (for example, an Investigator with no Clues and a lot of junk in their inventory), but often losing gear, Spells and Clues can be a huge reversal that is best avoided, even at the cost of a back injury or necrophobia.
I keep these decks with my core game set, and use them for every game; there’s just no reason not to.
Investigator cards
The new Skill, Ally and Spell cards make no references to the board or other new mechanics, and can be implemented without using other components from the expansion. If the Tasks are removed from the new Common Item cards, and the Missions are removed from the new Unique Item cards (see below), the remaining cards can be implemented sans new mechanics as well.
Note that Dunwich saw the advent of Handless Weapons, which are Weapons that do not count towards the wield limit of “two hands worth” that normally applies during Combat. Accordingly limited in power, these Weapons are denoted by an X in the lower left corner where the hand symbol would normally be. There are only three such cards in the expansion: two copies of “Brass Knuckles” (a Common Item) and one copy of “Alien Device” (a Unique Item).
Implementation: During Setup, shuffle the appropriate Investigator cards from Dunwich into the respective core set Investigator decks. Then, for the Ally deck, return 5 random cards to the box (only 11 Ally cards may be used in any given game).
Notable benefits: Provides 55% more Skill cards, 45% more Ally cards, 52% more Spell cards, 23% more Common Item cards, and 44% more Unique Item cards.
Tasks and Missions

Tasks and Missions are new mechanics that are implemented via special Common Item cards and Unique Item cards, respectively. There are five different Tasks and eight different Missions.
Both are quests that require the possessor to visit a number of Locations on the Arkham board, in a specific order, in order to gain a significant reward of some sort. Tasks are simpler in that the Investigator is only required to spend an Arkham Encounter phase in each Location in order to “check it off the list,” where Missions also require the Investigator to perform a specific sacrifice at each location (Items, Trophies, Clues, etc.) during the following Upkeep phase. Rewards for completed Missions are significantly better than those for Tasks.
Implementation: During Setup, shuffle the Task cards into the Common Items deck, and the Mission cards into the Unique Items deck.
Notable benefits: Introduces a new class of mechanic to the game— the “quest”— and in doing so, provides more strategic flexibility around accumulation of resources, in a manner that provides more thematic depth. Some of the Mission rewards are quite powerful (defeating Monsters, closing Gates, and removing Doom Tokens, for example); two of them actually provide new paths to Victory (“For the Greater Good” and “Joining the Winning Team”).
Gate Cards
Some of the new Gate cards (7 of 32) involve Madness and/or Injury cards, but if these decks are being used, there’s no reason why the new Gate cards could not be added to the core set Gate deck independently of the Dunwich board. Some of the Gate cards do refer to the two new Other Worlds (Another Time and Lost Carcosa), but since all Gate cards have an “other” entry for use with an unlisted Other World, this is a non-issue.
Implementation: During Setup, shuffle the Gate cards from Dunwich into the Gate deck.
Notable benefits: Provides 65% more Gate cards.
Monsters

About half of the new Monster markers can be used independently of the rest of the expansion. One of them (The Beast) is a Mask monster; like the core-set Mask monsters, it is only used if the Ancient One is Nyarlathotep.
Nine of the Monster markers are a new class of Monster called Spawn Monsters (demarcated by a red circle on the bottom left of the front of the marker). This new type of Monster is not placed in the Monster Cup to be drawn randomly; rather, they come into play as the result of specific game events. As such, they should not be used unless the whole expansion is implemented. (Additionally, Spawn Monsters do not count towards monster population limits, cannot be sent to the Outskirts, and cannot be claimed as trophies when they are killed.)
Three of the new Monster types (Mummy, Rat-thing and Star Vampire), accounting for five of the new markers, have a new type of movement: Stalker Movement. Denoted by a purple border on the marker, Stalker Movement consists of Normal Movement (black border) unless there is an Investigator in an adjacent Street area or unstable Location, in which case the Monster moves to the Investigator’s space; as with Flying Movement, if there are two adjacent Street areas or unstable Locations with Investigators, the Monster will move to the investigator with the lowest Sneak skill.
Implementation: During Setup, add the non-Spawn Monster markers from Dunwich to the Monster Cup. Do not add The Beast unless the Ancient One is Nyarlathotep. Note: Unlike the Dunwich cards, the Dunwich Monster markers are NOT marked with the expansion symbol to allow for easier separation after play. Reference the list found here (sort it by expansion) if necessary.
Notable benefits: Provides 33% more non-Mask Monster markers and ten new Monster types.
Investigators
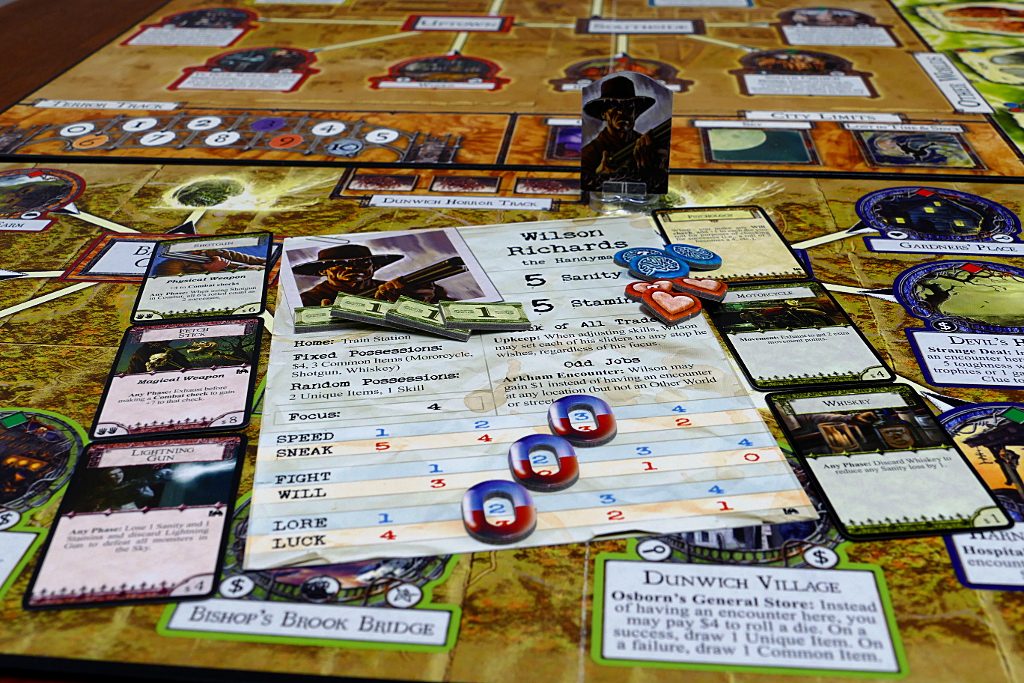
There are eight new Investigators in this expansion: the Soldier, the Entertainer, the Musician, the Expedition Leader, the Psychic, the Handyman, the Athlete, and the Redeemed Cultist. There is nothing to prevent using them in the absence of the other components (although Rita Young’s unique ability involves the Injury and Madness mechanics). In the Author’s opinion, four of them are worth playing (the last four listed).
Implementation: During Setup, add the new Investigator cards to the ones from the core set.
Notable benefits: Provides 50% more Investigators; half of them are really solid characters.
Ancient Ones

As with the new Investigators, there is nothing that would prevent using the four new Ancient Ones without implementing the entire expansion, but three of them of them do require other components from the expansion: Abhoth uses the three “Child of Abhoth” Spawn Monsters, Glaaki uses the five “Servant of Glaaki” Spawn Monsters, and Shudde M’ell uses the seven Rubble tokens.
Implementation: During Setup, add the new Ancient One sheets to the ones from the core set.
Notable benefits: Provides 50% more Ancient Ones, and they are brutal.
The Board
The Dunwich board, which is physically one-third the size of the core board (two panels wide by one panel tall), consists of three Neighborhoods: Village Commons, Backwoods Country, and Blasted Heath (this last being from the H.P. Lovecraft story “The Colour Out of Space”, which is also represented in this expansion by the eponymous Monster). As on the core set board, each Neighborhood consists of a Street space and three connected Location spaces. Additionally, there is a lone Street space, Sentinel Hill, in the center of the board; it is ringed by (and connected to) the three Neighborhood Street spaces. Of the nine Locations, five are Unstable.

Additionally, there are three Vortex spaces, one connected to each Neighborhood Street space, which are part of the Dunwich Horror mechanic discussed below, two new Other Worlds (Another Time and Lost Carcosa) and a three-space Dunwich Horror track (also part of the Dunwich Horror mechanic).
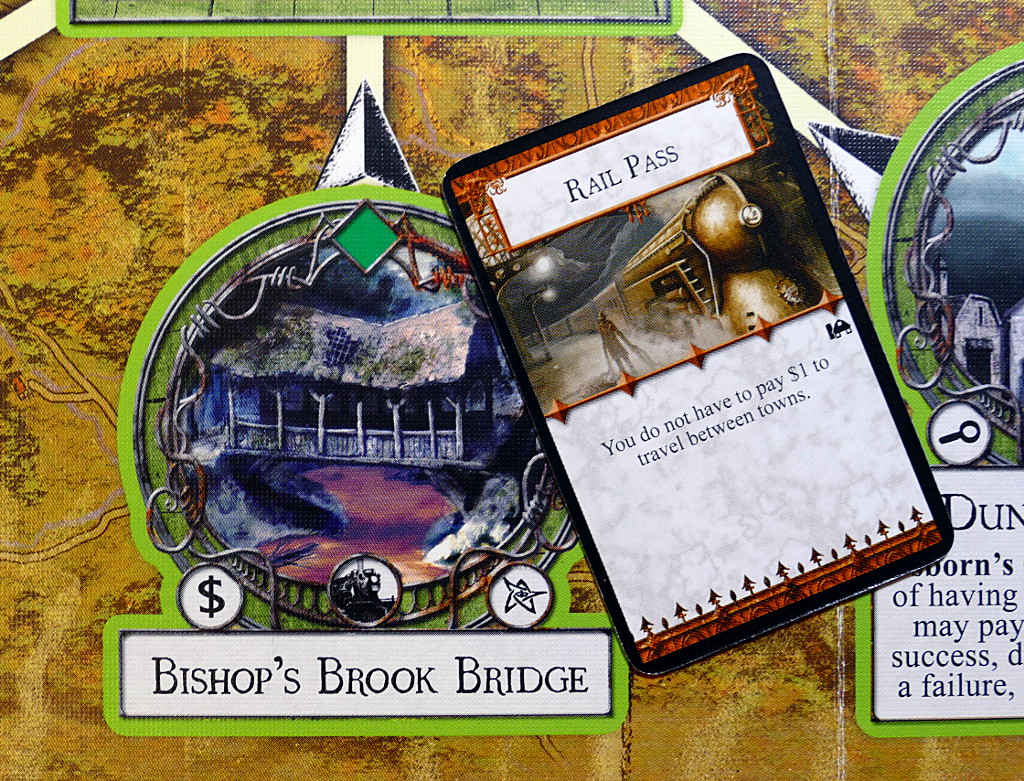
Travel between the core set board and the Dunwich board is pretty straightforward: an Investigator moves to the Train Station as normal, then spends $1 and one Movement Point to move to the Dunwich train depot, which is in the Bishop’s Brook Bridge space (as denoted by the locomotive icon), and continues their move on the Dunwich board with any remaining Movement Points. Traveling back to Arkham works the same way.
It is possible to obtain a Rail Pass during a Location Encounter at the Train Station or Bishop’s Brook Bridge; an Investigator possessing a Rail Pass does not have to pay the $1 fee to travel between boards. The odds of the appropriate encounter happening are 1:6 at each Location; at the Train Station you are offered the opportunity to buy a Rail Pass for $3; at Bishop’s Brook Bridge you find a discarded Rail Pass if you pass a Luck check [-2].
Other New Mechanics
In addition to the new mechanics already discussed above are:
Gate Bursts

Dunwich saw the advent of Gate Bursts, a mechanic that is used in some expansions to complicate the most direct route to Victory (sealing six gates).
Normally, if the Mythos card drawn during the Mythos phase indicates that a Gate opens at a Location that has been Sealed, the Elder Sign will prevent the Gate from opening (and the concomitant Monster from spawning). With the addition of this new mechanic, if the background of the Gate Location text on the card is red (actually more of an orange color), and the Location has been Sealed, a Gate Burst occurs.
A Gate Burst removes the Elder Sign from the Location, allowing a Gate and a Monster to spawn as normal, although a Doom Token is not added to the Doom Track. Additionally, a Gate Burst causes all Flying Monsters in play to move, regardless of their Dimensional Symbol.
A quick look at the statistical summary of the Mythos cards (found in the Player Aids section below) shows that Gate Bursts can happen for all but the least-common Gate spawn points, and that a Gate Burst is about 15% likely at the Locations where it can occur.
Sheldon Gang Membership
A Sheldon Gang Membership can sometimes be obtained at the Woods in trade for Trophies; the odds of an offer being made are 1:6. A Sheldon Gang Membership allows an Investigator in any Street space to attempt to “engage in some petty larceny” during their Upkeep phase, possibly gaining Money, a Common Item, or a Unique Item. This can be a productive way to spend “downtime” when you have to end your movement in the streets for some reason, although there is a 1 in 6 chance of being Arrested.
Condition Cards

Condition Cards are a new type of Special card that effect a persistent positive change in the game when “activated” by an Investigator’s actions, and that may be “deactivated” later by other occurrences. This is a pretty cool concept, and, as some of the Condition Cards make pretty big changes to the game, Conditions have strategic value.
A good example is “Coded Messages,” a Condition which allows Investigators to trade Clue tokens as if they were items (which is a huge advantage). It is activated by accepting a rare (1:13 odds) offer at the Newspaper to turn in a Gate Trophy, a Monster Trophy and a Clue token.
The other three Conditions are:
- Darke’s Blessing: Any Investigator can re-roll a failed Skill check by Exhausting the Condition card. Activated at Darke’s Carnival by accepting a rare (1:13 odds) offer to discard a Blessing card.
- Rare Book Collection: Investigators can trade 1 Sanity for 1 Clue token as a Special Encounter at the Library. Activated at the Library by accepting a rare (1:13 odds) offer to discard a Necronomicon card from the Investigator’s inventory, returning it to the box (i.e. removing the card from the game). The Necronomicon is a Unique Item from the core set that has a value of $6.
- Velma’s Gratitude: Investigators never lose Money as a result of Encounters at Velma’s Diner, and are always treated as if they had spent the maximum amount of money. Activated at Velma’s Diner as a result of a rare (1:13 odds) Encounter in which an Investigator with a minimum Fight skill of 4 voluntarily draws an Injury card.
The Dunwich Horror
The bastard “child” of Yog-Sothoth and Wizard Whateley’s half-deformed albino daughter Lavinia, the literary Dunwich Horror was brought into being by the Whateley clan and, with much time and trouble, raised to a monstrosity on cattle— and perhaps other, darker victuals— with a view to its eventual role in the opening of a hilltop gate to the spaces “between” the “spaces we know”, allowing the Old Ones to return and “rule where man rules now.”
In the expansion, The Dunwich Horror plays much the same role, lurking in the background as a brooding, growing menace that gradually increases the pressure on the Investigators, finally bursting forth in approved weird fiction style, hastening the Awakening of the Ancient One while running amok in a seething, writhing, mutating fury of destruction… until it is (hopefully) destroyed by the intrepid Investigators.
Unlike its literary counterpart, The Dunwich Horror can return over and over again when the conditions are right.

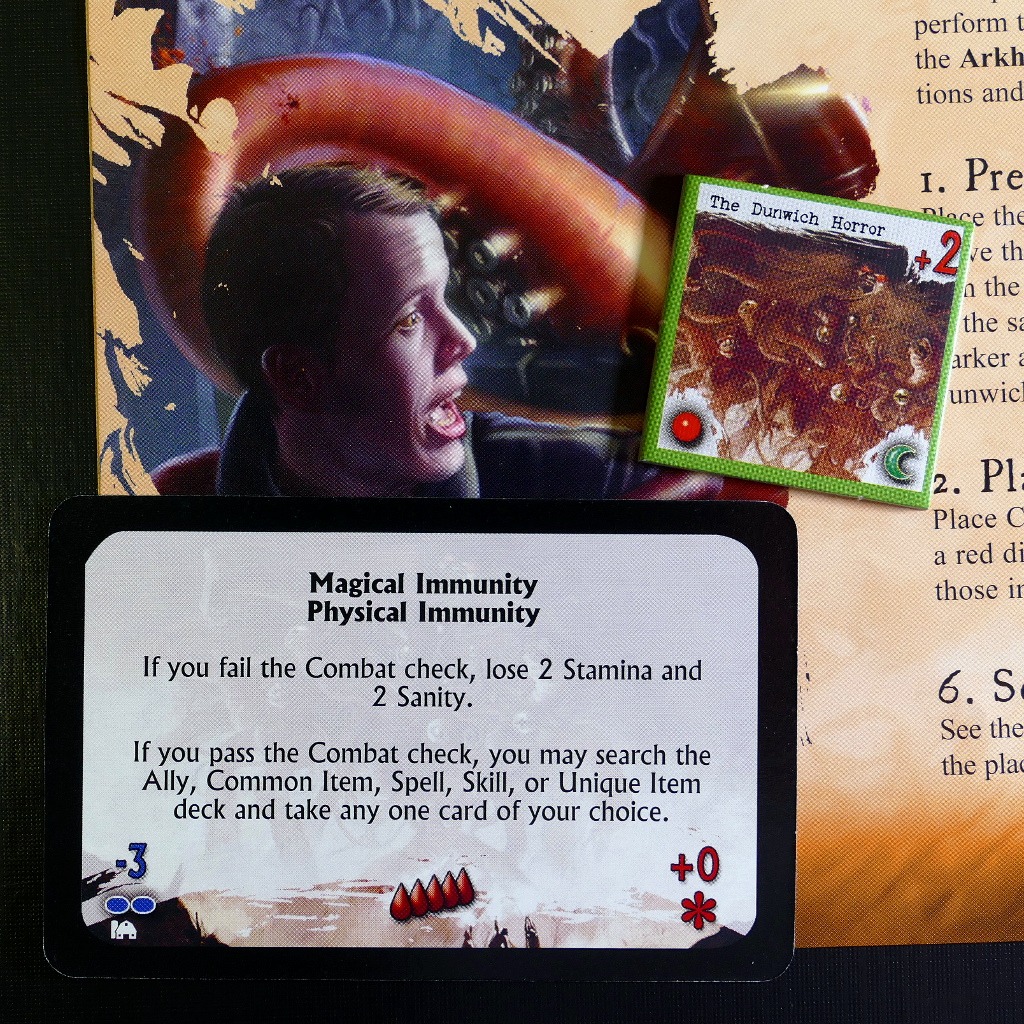
The key to the Dunwich Horror mechanic (no Yog-Sothoth pun intended) is the three aforementioned Vortex spaces that are attached to the Neighborhood Streets. Investigators cannot enter Vortices, but Monsters can… and every time a Monster enters a Vortex space (and is then returned to the Monster Cup) the Terror Level in Arkham is raised by one, and one token is added to the Dunwich Horror Track. When the track fills up— and there are only three spaces on the track— The Dunwich Horror spawns at Sentinel Hill.
It cannot be ignored, because rather than moving— and it has a crescent Dimensional Symbol, so it will “move” quite often— it has a 50% chance to add a Doom token to the Ancient One’s Doom Track. A proper mini-boss, it is not easy to kill, either; it has an unparalleled Toughness of 5, and each time it is engaged in Combat, its Combat Rating, Combat Damage and Special Abilities are determined randomly by drawing a card from the Dunwich Horror deck. There is one commonality between all of the cards: failing a Combat check is a bad, bad thing.
If The Dunwich Horror is defeated, the Investigator that destroyed it gets to search the Investigator decks for an Ally, Item, Spell or Skill of their choice, and the Dunwich Horror Track is emptied… until another Monster enters a Vortex and the cycle begins again.
Analysis

Looking at the number of spaces, and not counting the Vortices (which Investigators cannot enter), adding the Dunwich board increases the total number of spaces by 37%, so there is a bit more than a third more territory to cover, and the number of Locations increases about the same (35%). This increase in playing area makes Items and Skills that increase the Speed skill or provide extra Movement points even more valuable, and devalues Investigators with a low Speed skill.
Given the $1 cost of a “train ticket” to move from one board to another, it is probably wise to increase cash-on-hand on Investigators from $2 (enough for an emergency trip to the Arkham Asylum or St. Mary’s Hospital) to $3, and more than that for Monster hunters and Gate closers that might have to cross over more frequently.
One other obvious way to address the above points is to use more Investigators, with some dedicated to Dunwich.
Dunwich adds 5 Unstable Locations to the 10 in Arkham, so the number of possible Gate spawn Locations increases by 50%. An analysis of the combined Mythos deck shows that 76% of the Gate spawns from Mythos cards occur in Arkham, and 24% occur in Dunwich… so the Unstable Dunwich Locations are statistically under-attacked by the Mythos.
Wizard’s Hill is a high-Gate-frequency Location, Gardners’ Place is medium-frequency Location, and the other three are low frequency, so sealing Wizard’s Hill and Gardners’ Place will essentially eliminate Gate spawns in Dunwich— until a Gate Burst occurs.
As noted above, Gate Bursts can occur at all but low-Gate-frequency locations, and are about 15% likely to occur whenever there is a chance. This prolongs the game by making the easiest route to Victory subject to periodic reversals, and increases the need to focus on sealing Gates, as well as the demand for Clues.
A similar Mythos deck analysis of Clue spawns shows that a random Mythos card is 70.1% likely to spawn a clue in Arkham and 21.4% likely to spawn a Clue in Dunwich. Dividing these percentages across the number of gate-spawning Locations provides the chance of an “average” Location on each Board to spawn a Clue: 3.89% for Arkham and 3.06% for Dunwich. Thus, on average, Clue spawns are 21.5% less likely in Dunwich than in Arkham.
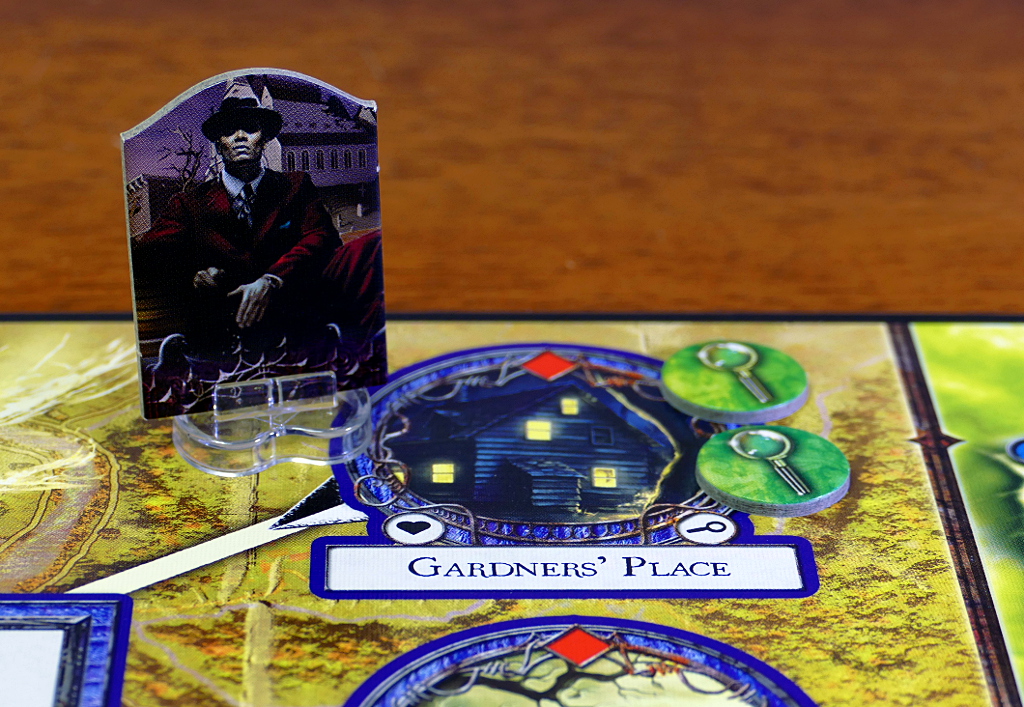
Gardners’ Place is a high-Clue-frequency Location, and Cold Spring Glen is medium-frequency.
Four of the Dunwich Locations have Special Encounters; they variously allow Investigators to: trade Trophies for both Money and Clues; pay $4 for a random Item (2:1 chance of Common vs. Unique); gamble at even odds; and regain a point of Stamina or Sanity for free.
Gambling at even odds is essentially pointless in a game where every turn counts, and $4 is, on average, overpayment for a Common Item, and only about 50% likely to be a good deal on a Unique Item— and there is no choice of item in this case, as you only draw one— so grinding gear at the stores in Arkham is likely to be more efficient, at least as far as using Special Encounters goes. Trading the standard amount of Trophies for 1 Clue and $2 is just a bit of a downer compared to Arkham, where the same trade would get you 2 Clues or $5, but is possibly worth it for the convenience of getting a Clue and Money at the same time. Regaining a free point of Stamina or Sanity (player’s choice) is probably the best deal of the four.
Monsters in Dunwich are significantly more problematic in terms of elevating the Terror Level; since they don’t count towards the Arkham “Monsters in play” limit, they don’t overflow to the Outskirts— which takes multiple Monsters to overfill and trigger a Terror Level increase— rather, each Monster in Dunwich can cause a Terror Level increase by itself if it enters a Vortex space.

Accordingly, while Monster control can be neglected to some extent in Arkham in the early game, until Investigators are well-equipped enough to deal with them effectively, the same cannot be said for Dunwich. Of the three Street spaces connected to Vortices, Village Commons is the most critical to keep clear, as both of its Monster movement arrows point to the adjacent Vortex space.
Another way that the boards are connected with respect to Monsters is the Sky. The Sky is considered to be adjacent to both boards, so a Flying Monster that spawns in Arkham can move to the Sky, and subsequently to Dunwich, and vice versa.
Monster control in Dunwich being as important as it is, I’ll note that Locations in Dunwich where Encounters can spawn Monsters are: Cold Spring Glen, Devil’s Hopyard and Whateley Farm: 1:13 odds; Gardners’ Place: 1:13 odds of a Monster and 1:13 odds of a Monster plus a Gate; Wizard’s Hill: 1:6 odds of a Monster plus a Gate. Wizard’s Hill is another bad place to hang out.

The best and safest Locations for grinding gear and resources via Encounters are Darke’s Carnival and Harney Jones’ Shack; the only bad thing that can automatically happen to an Investigator at Darke’s Carnival is losing a turn, and that at 1:13 odds; “no encounter” is the worst result at and Harney Jones’ Shack (3:11 odds). Otherwise, both locations provide bounteous scroungings. The chance at the Darke’s Blessing Condition card (1:13) makes Darke’s Carnival a particularly nice spot. Whatley Farm is not quite as safe, but there is a chance (1:6 odds) for an opportunity to remove a Dunwich Horror token by passing a Luck [-1] check, and most other Encounters (11:3) are positive.
The most perilous Locations, as far as Encounters goes, are Gardners’ Place (includes 1:13 odds of a Monster spawning, 1:13 odds of a Monster plus a Gate, and 1:13 odds of the Investigator being Devoured) and Wizard’s Hill (includes 1:6 odds of a Monster plus a Gate spawning and 1:6 odds of adding a token to the Dunwich Horror Track).
Given the relatively safe, lucrative nature of Encounters at the Newspaper in Arkham, and the 1:13 chance at the Coded Messages Condition card, lurking about the offices of the Arkham Gazette is another good proposition.
If one of the Investigators can restore Sanity on an ongoing basis (say via Carolyn Fern’s Unique Ability), obtaining and activating the Rare Book Collection Condition card is another good strategic move, as that Investigator can then literally camp the Library’s nifty new Special Encounter, trading Sanity for Clues. In combination with the Coded Messages condition, closers can easily be kept supplied with Clues for Gate sealing.
Player Aids
I have updated the player aids that I created for use with the core game wherever implementing one or more components of Dunwich would change them. If there is not a Dunwich update to a particular player aid, you can use the version for the core game.
The updated documents are:
- Setup
Covers the game setup process, including special cases and determination of all in-game limits/triggers, plus optional steps to set up the various Dunwich components.
arkham_horror_dunwich_setup.pdf - Order of Play
Detailed order of play document that covers all five phases of the game turn, including all situational rules, special cases and checks for limits/triggers. Includes optional rules for the various Dunwich components.
arkham_horror_dunwich_order_of_play.pdf - Combat
Covers the combat process, including all situational rules, special cases and Monster Abilities, as well as resulting Unconsciousness and Insanity. Includes optional rules for the various Dunwich components.
arkham_horror_dunwich_combat.pdf - DM Notes
More detailed handling of monster spawns, gate spawns, the Terror Track and character Devourment. Includes optional rules for the various Dunwich components.
arkham_horror_dunwich_dm_notes.pdf - Location Encounters
This is a summary of the Location Encounter cards, listed by Location. It includes the ratio of “good” cards to “bad” cards (a measure of how risky the Location is), which skill checks might be required (and how likely each is), and a list of the best (for “good” cards) or worst (for “bad” cards) possible results. Updated to include Location Encounter cards from the Dunwich expansion.
arkham_horror_dunwich_loc_ enc.pdf - Location Special Encounters
This is a list of the various Special Encounters on the game board. Special Encounters allow guaranteed resource conversion (for example, trading Money for Sanity at the Arkham Asylum) and are thus often of tactical and strategic interest. Updated to include Location Special Encounters from the Dunwich board.
arkham_horror_dunwich_loc_spec_enc.pdf - Mythos Cards
This is a statistical summary of the Mythos cards, with the data presented by Location. For each, it lists the chance of a Gate opening each time a Mythos card is drawn, the chance of a Clue spawning each time a Mythos card is drawn, and the ratio of the two, which indicates the safest, most Clue-productive Locations as regards Mythos cards (Gates and Clues can spawn for reasons other than Mythos cards). Updated to include the Mythos cards from the Dunwich expansion, and to list the chance of an attempted gate spawn at a Sealed location causing a Gate Burst.
arkham_horror_dunwich_mythos.pdf

Leave a comment